If you’re into woodworking and thinking about stepping up from an old lunchbox planer, the Oliver 13-inch Planer (model 10045) is definitely worth checking out. I upgraded to this planer after my trusty Ridgid TP1300 finally gave out in the middle of a cabinet job, and honestly, I haven’t looked back since. The Oliver has made such a difference in my shop, so I’m happy to share how it’s performed, what makes it stand out, and some tips that helped me make the switch.

Overview: Why I Chose the Oliver 13 Inch Planer
Last year, right in the midst of planing maple for new cabinets, my Ridgid TP1300 just quit. Bought in June of 2003, I couldn’t blame it; it had worked hard for 21 years. But when I priced out replacement parts, the cost was actually higher than buying a new Ridgid planer. That got me thinking: Why replace like-for-like, when I could finally pick up a benchtop planer with a helical head?
I’d been eyeing up the Oliver for a while, mainly for its factory-installed BYRD Shelix cutter head. After comparing price, features, and user reviews across the DW735x and some budget models, I went with the Oliver 10045, purchasing it from Woodcraft. Looking back, I’m so glad I made this switch. The difference in noise, cut quality, and sanding time is impressive.
- The old Ridgid was LOUD, mostly because it used 2 straight knives.
- The Oliver’s helical head with carbide inserts runs quieter and produces much smoother surfaces. Most boards barely need sanding afterward.
- The price was higher than a basic planer, but not when you factor in the cost and hassle of putting a helical head in later.
This has easily become one of my favorite shop upgrades yet.
Quick Look at Oliver Machinery’s Background
For anyone who appreciates solid tool heritage, Oliver Machinery goes way back. Founded in 1892, they made a name for themselves as one of the first US manufacturers building heavy-duty woodworking machines. Over the decades, they’ve built a reputation for tough, quality equipment—planers, jointers, belt sanders, and shapers included.
The Oliver name has stuck around for a reason. Even these days, you’ll spot plenty of old Olivers still running strong in cabinet shops decades after they were built.
Specs & Key Features of the Oliver 13 Inch Planer
- Cutter Head: Authentic BYRD Shelix helical head with 36 indexed carbide inserts (factory installed). Other manufacturers void the warranty when you install a helical head in the planer.
- Motor: 2 HP, 15 Amp, 115V (standard household circuit), belt driven for steady torque
- Table Width: 13 inches max width, up to 6 inches thickness
- Feed Rate: 2 speeds – 26 feet per minute and 18 feet per minute
- Weight: About 68 lbs (light enough for bench use, but heavy enough to stay put)
- Dust Port: 4 inch or 2.5 inches standard, fan-assisted ejection system (with vacuum adapter included)
- Preset Depth Stops: Four quick stops for popular thicknesses
- Wixey Digital Readout: Displays thickness in inches, mm, and even finds the nearest fraction as you adjust
- Carriage Lock: Keeps the cutter head from shifting for a better finish and accuracy
- Magnetic Safety Switch: No accidental restart if you lose power
All these features make the Oliver great for quick changes and spot-on accuracy.
Main Features: A Closer Look
- Helical Cutter Head (BYRD Shelix): The 36 angled inserts slice through wood rather than scrape it, which makes for a smooth finish and much lower noise. Every insert has four cutting edges, so if you hit a nail or get a nick, you just turn to a new edge—no pricey blade changes. Not many benchtop planers come with a BYRD Shelix from the factory, and this is a big selling point. This is one of the things I love most. My old Ridgid with the straight knives had a little dimple in one of the knives. It left a small ridge on the board. No longer a problem of having to change a whole blade for one little nick.
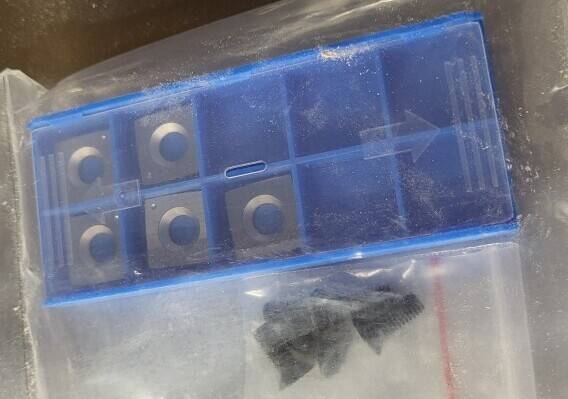
The planer also comes with 5 carbide inserts and insert screws
- Quiet Operation: Compared to my old Ridgid, it’s almost relaxing to use. The noise comes from the motor and wood passing through—no more high-pitched screaming from straight knives. But it is still loud, so be sure to wear ear protection.
- Powerful Motor: At 2 HP, it handles thick, dense hardwoods with no problem. I’ve planed maple, full 13-inch wide maple pieces as well as narrow boards without stalling.
- Digital Wixey Depth Gauge: I love seeing fractional readouts on the unit, so you always know where you stand. Metric options are handy for European users and projects. It also shows precise thickness down to 0.005 inches if you prefer that over fractions.
- Carriage Lock: This helps keep snipe to a minimum and guarantees your thickness settings stay put between boards.
- Dust Collection: The built-in blower throws out chips even if you don’t have a shop vac running. You can hook up a vacuum or dust bag; either way, it helps keep the shop cleaner. The Owner’s Manual recommends using a vacuum or dust collector with this planer. I fully agree. It does a much better job of evacuating chips with something attached, helping to pull chips away. And then you don’t have to sweep them up either.
- Preset Depth Stops: Four popular settings let you quickly repeat common thicknesses if you’re working with lots of boards at once.
- Easy Blade Access: Pop off the top cover with two bolts for fast access to the cutterhead. Swapping or rotating inserts is a breeze—no special tools needed. The tool needed is included with the machine and stores in the top of the machine.
- Smooth Crank Adjustment: Raising and lowering the head is easy, and the resistance is just right for precise control.
- Portable but Stable: At 68 lbs with bottom-mounted handles, it’s easy enough to store on a shelf when you need space, but it won’t bounce around when in use. Those handles make carrying much safer and easier. But putting it on a stand with casters makes it much easier to move.
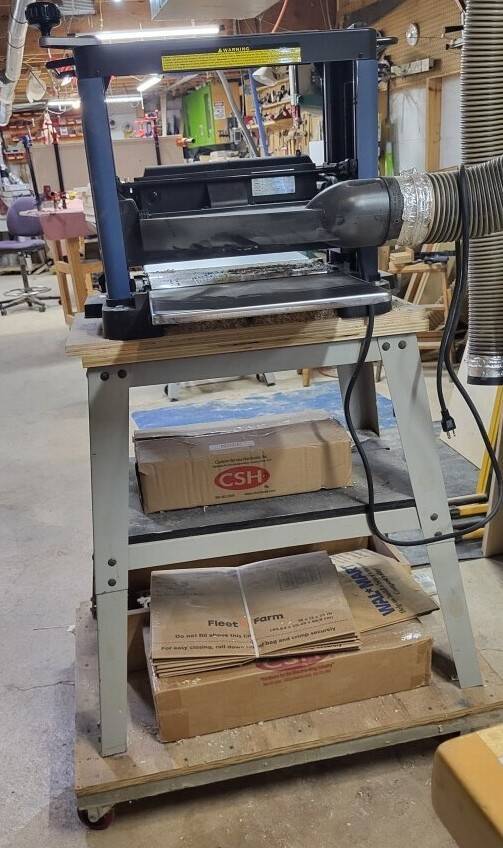
Here is rear view of the unit on the stand from the Ridgid planer. You can see here that I have a 4 inch dust collection hose on it. The handle on the top and bottom for lifting and carrying the unit are visible on the left side of the planer. But the casters on the bottom of the stand are much better than carrying it anywhere.
- Safety Switch: A magnetic reset switch is a practical feature, especially when dealing with power interruptions.
Real-World Performance: My Experience
As soon as I set up the Oliver, the first thing I noticed was the reduced noise level. It’s still a planer, so hearing protection is wise, but compared to the old lunchbox models, it doesn’t feel like you’re standing next to a jet engine.
Sound Volume Test
Using a sound meter on my phone, I tested the noise level in my shop in several ways to compare the sound level this planer makes. The sound meter was placed approximately 4 feet from the planer, table saw, or router table. The air filter was above the unit, 7 feet away, and the dust collector was 6 feet away.
- All equipment and air filters systems off in shop. 56 dB
- Turning on overhead airfilter. 73 dB
- Turning on 1 1/2 hp dust collector. 81 dB
- Turning on the planer no load. 86 dB
- Planing a 6 1/2 inch maple board. 88 dB
- Testing the table saw under no load. 82 dB
- 3 hp Router Table, no load 85 dB
- Router table under load using a tongue making bit. 89 dB
I wish I had a comparison to the old Ridgid unit, as I know that was much louder with the universal motor and the two straight knives.
Organizations like the National Institute for Occupational Safety and Health (NIOSH) recommend limiting workplace noise exposure to 85 dBA for 8 hours. But even a few minutes repeatedly can cause hearing damage. So, I definitely recommend ear protection when using any planer or other shop equipment.
Cut Quality
The cut quality truly stands out. I work with a lot of maple, and the finish from this helical cutter is smoother than what I got from sanding with 120 grit before. On test boards of rough-sawn lumber, the Oliver made them smooth in no time.
- With the carriage locked, I see practically no snipe. On softer woods like pine, if I forget to lock it, there can be a slight snipe, less than 1/64th inch, which is easy to sand out or trim if I’m batching parts. Lifting the board at the beginning and ending of the cut also helps to reduce snipe if needed.
- The infeed and outfeed tables are adjustable, so you can dial in great transitions. The manual covers this setup step clearly, unlike many budget machines. I had set the in and out feed tables too high at the ends to help reduce snipe. This made the snipe worse. Lowing the ends of the in and out feed tables just slightly above the bed reduced snipe to almost 0 on all my boards.
- It is portable, but I recommend putting it on a stand with casters if you have the room. It is much easier to roll it out for use, rather than to have to lift it up onto something every time you want to use it.
I took a rough cut board and ran it through the planer to show the cut quality. The board was not jointed on the first side and had some twist in it. Normally, I would not send a board like this directly through the planer first. But you can clearly see how well this planer handled that board.
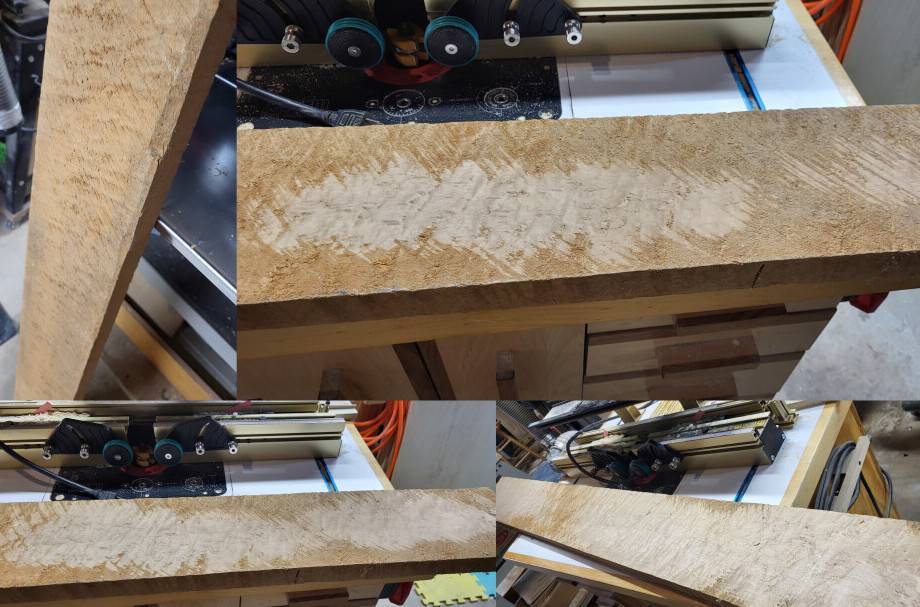
Upper left is the rough maple board. Top right, first pass. Bottom left, second pass. Bottom right, third pass.

Here you see the 4th pass through the planer. I didn’t know when I started planing this board that it was curly and bird’s eye maple. There was not one bit of tear our in any of the figure on this board.
There are a few things I am not as fond of with the unit.
- The top of the unit is metal, which is great. But the sides are plastic. The metal top is screwed to the plastic sides so the screws strip out easily if not careful. If it becomes an issue, small bolts and nuts will easily solve the problem.
- The top screw on the left side needs to be removed to attach the Wixey unit. This is how I learned about the problem mentioned above. Be sure the rod for the Wixey unit is vertical and not slanted at all.
- The Wixey unit is on a hinged mount, so the measurements weren’t accurate at first, and there was play when reversing directions. Tightening the screw holding the Wixey unit to the mount fixed that problem.
- The height adjustment wheel is on the top of the unit. It was on the side of my old Ridgid planer. I do find it was easier on the side because of my bad shoulder. The wheel on the top is higher and a little harder for me. I suspect for most people it would not be a problem.
As you can see, the cons are quite minor for this unit. The pros of the machine greatly outweigh these few small issues.
Value: Choosing the Oliver Over Other Benchtop Planers
The Oliver isn’t the cheapest benchtop planer out there, but if you add up the price of a top-tier lunchbox planer plus a helical head retrofit (like for a DeWalt DW735), it’s clear why buying the Oliver from the start makes sense. And if you get it on sale like I did, it was under $1,000.00.
- The BYRD Shelix head comes pre-installed, perfectly aligned at the factory.
- Build quality is solid, with attention to detail in every part.
- If you want great results, less noise, and a planer that will keep going for years, the Oliver is easy to recommend.
- And from what I have read, retrofitting the Dewalt with a helical head voids the warranty.
After running hundreds of board feet through it, I’m convinced it’s a better long-term investment. I don’t have to fight old blades, endure painful noise, or sand endlessly. It genuinely smoothes the workflow in the shop.
What You Might Want to Think About Before Buying
- Weight and Portability: At 68 lbs, it’s more portable than a stationary planer, but it isn’t super light. If you move tools a lot or have limited bench space, plan for a spot to store it or invest in a good rolling cart.
- Infeed/Outfeed Stands: The front table folds for storage, but the rear table doesn’t fold flat due to the dust port. Not a major issue—this is normal for benchtop planers—but worth knowing if your shop is tight on space.
- Dust Collection Setup: While the built-in blower helps, using a shop vac or dust collector keeps your area much cleaner, especially with all the chips from helical cutters.
Full Specs at a Glance
- Planer Type: Benchtop with Helical (BYRD Shelix) Cutter Head
- Motor: 2 HP, 15A, 115V Single Phase
- Maximum Planing Width: 13 inches
- Maximum Thickness Capacity: 6 inches
- Cutting Depth: Up to 1/8 inch per pass (depends on stock width and wood type)
- Number of Inserts: 36 four-sided carbide inserts
- Feed Rate: Two speeds for best finish or fast roughing
- Weight: 68 lbs
Advanced Tips for Getting the Most Out of Your Oliver Planer
- Index Cutter Inserts Regularly: Inspect the cutterhead every so often for nicks or dull inserts. Switching to a fresh edge keeps your surface quality excellent.
- Adjust Outfeed Table for Snipe Elimination: Spend time tuning the infeed and outfeed tables at setup; this can make snipe almost vanish.
- Take Light Passes on Hardwoods: While the motor has power to spare, lighter passes on tricky or figured woods help reduce tear-out and lead to cleaner results.
- Pair with Decent Dust Collection: Even with the built-in blower, a dedicated dust collector makes shop cleanup simple and hassle-free.
- Periodically Check Digital Readout Calibration: Every few months, compare the Wixey readout with calipers or a machinist rule to ensure your thickness settings are still spot on.
- Keep Spare Inserts on Hand: If you do a lot of work with reclaimed lumber, you may hit nails occasionally. Keeping extra carbide inserts makes repairs quick and avoids downtime.
Frequently Asked Questions
Q: How does the noise level compare to standard lunchbox planers?
A: The Oliver 13 inch is definitely quieter, mainly because the BYRD helical head slices instead of chopping. It’s still not silent, but ear fatigue is much less of an issue.
Q: How hard is it to get replacement inserts for the BYRD head?
A: Pretty easy. The BYRD Shelix inserts are widely available online and from woodworking stores. Swapping them out takes a couple of minutes with the supplied wrench.
Q: Can it handle rough, wide hardwood slabs?
A: I’ve planed 12 and 13 inch maple without any hesitation. Just pay attention to depth settings and let the cutterhead do the work. Anything wider than 6 inches should be planed with a shallower cut. Refer to the Owner’s Manual regarding this. Your machine will last longer and your wood will be planed better.
Final Thoughts: Would I Buy the Oliver Planer Again?
YES, DEFINITELY!!! After using the Ridgid planer for 21 years, upgrading to the Oliver 13-inch made a huge improvement in my workflow. The combination of quieter operation, better surface finish, tool-free maintenance, and thoughtful design has made it one of my most satisfying purchases for the shop. If you’re looking to make a long-term investment that speeds up your projects and gives you a better final product, this planer is definitely worth a close look.
When you click and buy through our links, you’re not only upgrading your woodworking game but also supporting The Master’s Workshop of WI—at no extra cost to you. It’s a win-win: you get the best tools, and we keep bringing you top tips and content!
Mike’s Favorites
These are the tools I reach for on almost every project. The seven below are my quick-grab essentials—open the full list for everything I keep on the bench and in my apron.
Top 7 Essentials
- iGaging 6″ Fastener Cal Digital Caliper — Quick, precise checks.
- iGaging 7” and 12” Layout Square Set (also available at Taylor Toolworks) — Reliable layout reference.
- Starrett 6″ Double Square — Everyday layout accuracy.
- Woodcraft 16 ft Tape Measure (Fractional) — Compact; blade stays out on its own.
- Taytools Stainless Steel 6″ Machinist Ruler (4R) — My most-used small measuring tool.
- RZ Mask M2 9-Piece Woodworker’s Kit — Reusable protection against fine dust; far more comfortable than disposables (also available at Amazon).
- ISOtunes PRO 3.0 Bluetooth Hearing Protection — OSHA-certified hearing protection with streaming and calls.
➤ See my full list of Favorites
On the Bench Tools
- iGaging IMPERIAL Bench Squares – Stainless steel blades with wide anodized aluminum base.
- iGaging 7” and 12” Layout Square Set – Anodized aluminum (also available at Taylor Toolworks).
In My Apron Tools
- Katz-Moses 20 oz Waxed Canvas Tool Apron (The apron isn’t in my apron—LOL—but I’d be lost without it.)
- iGaging 6″ Fastener Cal Digital Caliper
- 6-Pack Mechanical Carpenter Pencils with Sharpener and Refills
- Pentel GraphGear 1000 Mechanical Pencil
- Calculated Industries 4019 Material Estimator Calculator
- Woodcraft 16 ft Tape Measure (Fractional) or FastCap Old Standby 16 ft (also at Taylor Toolworks). I prefer the Woodcraft because it’s smaller and the blade stays out on its own. The FastCap works too, but you have to lock and release the blade each time.
- Starrett 6″ Double Square – Hardened graduated blade.
- Starrett 4″ Double Square – Satin chrome finish, hardened blade.
- iGaging 4″ & 6″ Double Square Set (also at Taylor Toolworks). I was gifted my Starrett squares and treasure them, but this iGaging set is a well-made, affordable alternative I’d recommend if you’re buying your own.
- Lufkin Red End Extension Folding Rule (5/8″ × 6 ft) or Crescent Lufkin Wood Rule (6′ Brass Extension). I keep a folding rule for places a tape can’t manage—checking inside a box for square, or when I need a longer, rigid measure. Get one with a brass extension so you can capture full measurements when another arm won’t swing into place.
- Taytools Stainless Steel 6″ Machinist Ruler (4R) Even with other measuring tools, this little rule probably gets used the most.
- EverBrite 9-LED Flashlight, 6-Pack (Assorted Colors)
- Mikov Thin Blade Dual Bevel Marking Knife (0.060″, Rosewood Handle)
- Narex Thin Blade Dual Bevel Striking Marking Knife (also at Amazon). Yes, I carry two knives: this one’s longer for reach where the Mikov can’t go.
Shop Safety Essentials
- RZ Mask M2 9-Piece Woodworker’s Kit — Breathable, reusable, and essential for sanding/cutting (also available at Amazon).
- ISOtunes PRO 3.0 Bluetooth Hearing Protection — OSHA-certified hearing protection with streaming and calls.
Some links above are affiliate links. Thanks for supporting The Master’s Workshop of WI!
This list is updated as I refine my shop setup and favorite tools.