Accidents can happen in a blink when you’re woodworking. I know, because I once walked away from a nasty kickback with a swollen wrist instead of missing fingers. That close call convinced me that building good safety habits is the only way to enjoy woodworking for the long haul.
Woodworking shop safety rules exist for a reason. Something as simple as proper eyewear or paying attention to your workspace can prevent woodworking injuries and mean the difference between a fun afternoon and a trip to urgent care.
Whether you’re tinkering on a small box or ripping full sheets of plywood, wood shop safety isn’t about paranoia—it’s about working smart so you can spend years building cool stuff. Here are 9 essential woodworking safety tips every woodworker should know.
When you click and buy through our links, you’re not only upgrading your woodworking game but also supporting The Master’s Workshop of WI—at no extra cost to you. It’s a win-win: you get the best tools, and we keep bringing you top tips and content!
1. Always Wear Proper Safety Gear
I can’t count how many times I’ve told myself “it’s only one cut” or “just a quick sanding.” That’s the lie that gets woodworkers in trouble. Sawdust in your face, a nose full of dust, or sore ears from a screaming router might feel like small annoyances, but those “only” and “just” moments add up to long-term damage.
Proper personal protective equipment (PPE) protects your eyes, ears, and lungs from constant shop hazards. And yes — even the little jobs can cause lasting harm if you let safety slide.
The main safety gear every woodworker should have includes:
- ANSI-rated safety goggles or a face shield to protect your eyes from sawdust, splinters, and flying chips.
- Hearing protection like earmuffs or noise-cancelling earbuds. Many power tools are louder than you’d think, and the damage adds up over time.
- Dust mask or respirator to filter out fine wood dust, especially with MDF, exotic woods, or heavy sanding. A respirator is a must when finishing projects.
- Work gloves for handling rough lumber or cleanup. But take them off when using anything with spinning blades — if a glove gets caught, your hand will be gone before you know what happened.
Never rely on regular eyeglasses for protection. Get proper safety goggles that meet ANSI standards; you’ll thank yourself later.

I keep my ISOtunes noise-cancelling earbuds around my neck and my green RZ dust mask tucked in my apron so they’re always ready. The rest of the gear — muffs, disposable mask, safety glasses, and face shield — stays right by the machines where I need them. If it’s within reach, I use it every time.
Investing in quality PPE means you can enjoy your projects and still see, hear, and breathe comfortably. The good news? Gear is affordable these days and worth every penny. I’ve linked to a few of my favorites in this article, but you can also find solid options at local hardware stores and trusted brands online.
For beginners, it’s easy to overlook the basics in the excitement of building your first project. But even experienced woodworkers stress PPE because the risks are real. The one time you skip goggles or hearing protection is usually the time something goes wrong. Wearing your gear should feel as automatic as grabbing a pencil before you mark a line on a board.
New to woodworking? Avoid these common beginner mistakes.
2. Keep Your Workspace Clean and Organized
A messy shop isn’t just an eyesore; it’s a tripping hazard, a fire risk, and a recipe for accidents. I’ve found that I work faster, safer, and with more focus when everything has a home and clutter is kept to a minimum.
- Keep the floor clear of offcuts, tangled cords, and tools that aren’t in use.
- Regularly sweep up sawdust. It builds up quickly and can make floors and benches slick. Remember, sawdust itself is flammable, so keeping it under control also lowers fire risk.
- Store flammables (like finishes and solvents) in safe containers and away from sparks.

Keep your floor area clean and free of trip hazards. Notice how the parts for different projects are stacked neatly along the sides, leaving a clear walking path and plenty of room to move safely.
When everything has its own space, it’s much easier to grab the tool you need without shuffling through piles of clutter. Nothing wastes more shop time—or focus—than having to hunt for a tool buried under the last project.
I keep a broom at each end of my workshop. If I can’t see my bench or cords on the floor, I stop and sweep before I make the next cut.
A tidy workspace also helps you spot missing tools or small issues before they become safety problems. And don’t overlook lighting—a well-lit shop makes hazards obvious and helps keep you accurate.
For more on arranging your space safely, see Setting Up Your Woodworking Shop.
3. Use Sharp, Well-Maintained Tools
Something I learned in culinary school years ago: a dull knife will cut you faster than a sharp one. The same is true with woodworking tools.
Dull blades and bits are sneaky — the more you muscle through, the greater the chance something will slip, bind, or kick back. Sharp tools not only give cleaner results, they’re safer and easier to control.
Check saw blades, chisels, and planer knives often. If they feel dull, scorched, or start leaving burn marks, it’s time to sharpen or replace them.
Keep a sharpening kit handy. A couple of diamond plates, a honing guide, and a strop can keep chisels and plane irons razor-sharp. A little tool maintenance along the way is far easier than wrestling with a fully dull blade.

An overview of the sharpening tools I keep handy at the workbench for quick touch-ups. A good guide like the Veritas shown here makes for repeatable results. With a diamond plate, a couple of water stones, and a leather strop, you can keep your edges sharp and ready for use.
Don’t cheap out on power tool blades. Replace damaged or bargain-bin blades promptly. Higher-quality blades might cost more upfront, but they last longer, cut cleaner, and reduce strain on both you and your tools.
Sharpen little and often. It’s quicker and easier to touch up an edge before it’s completely dull than to recover a badly worn blade. A few swipes on a strop or plate after each project can save you a major sharpening job later.
Staying on top of tool maintenance is one of the simplest woodworking safety tips, but also one of the most overlooked. A little regular TLC keeps everything running smoothly and safely — and it makes woodworking far more enjoyable.
For beginners, it pays to develop a routine. Give your tools a quick once-over before a project and after heavy work sessions. Learn what your tools should feel and sound like when sharp, and you’ll catch dullness or damage before it causes an accident.
4. Respect the Table Saw and Use Push Sticks
Nothing gets my attention in the shop quite like the kickback incident I share below. Table saws are incredible for breaking down lumber and plywood, but they’re unforgiving if you get complacent. And when something happens, it happens FAST!


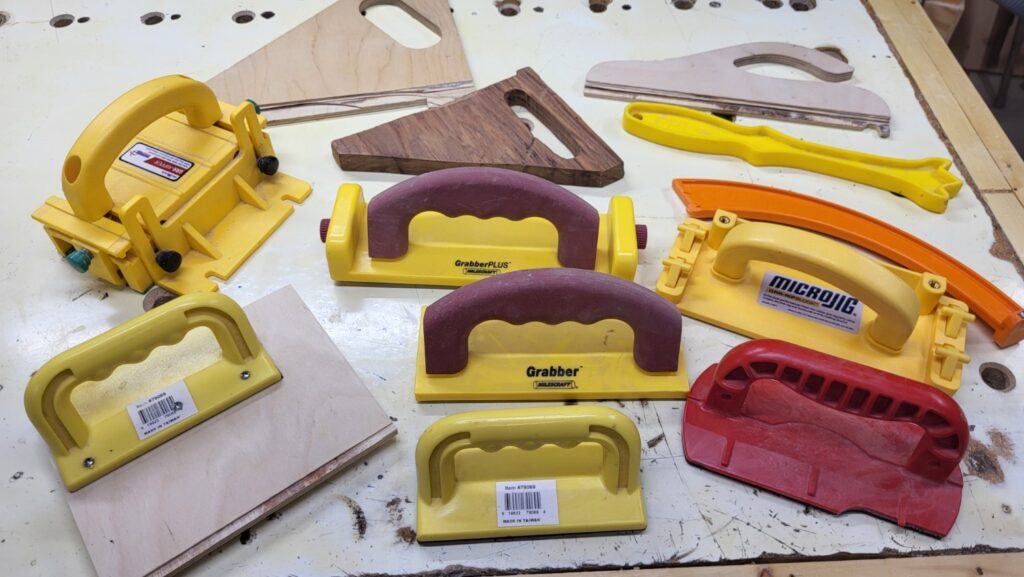
Homemade and purchased push blocks and sticks. Each one stays near the machine where it’s used most, ready to keep my hands safely away from the blade. Microjig and Milescraft make outstanding safety blocks.
A mix of purchased and homemade featherboards. The green models from Bow Products are fast becoming my favorites for their strong hold, added safety, and the ability to stack for taller workpieces.
- Always use push sticks and feather boards to guide your wood safely, especially with narrow rips or small pieces.
- Rule of thumb: if your hand is closer to the blade than 3 inches, use a push stick. Personally, I make that rule 5 inches. A push stick is a lot easier to replace than my fingers or hand.
- A riving knife (or splitter) behind the blade helps keep the kerf open, which prevents the workpiece from pinching the blade and kicking back.
- Always use your equipment’s safety guards. Yes, there will be times when it has to be removed for certain cuts — but make that the exception, not the rule.
- Never reach over or behind a spinning saw blade. Stand off to the side, with a stable stance.
Kickback happens in the blink of an eye. Never stand directly in line with the blade — always shift slightly to the side before starting a cut.
More than once, a simple push stick has kept my hands a safe distance away from spinning blades. It’s a tool every shop should have, and you can make your own from scrap plywood in a few minutes.

These push blocks and shoes show the scars of close calls. Better they take the hit than your hands — safety tools cost far less than a trip to the ER.
Whatever you do, respect your tools, especially the table saw. Take your time with setup and always check the blade height and fence alignment before you fire up the saw. The extra minute can save your fingers. And don’t forget those push blocks for router tables, jointers, and planers as well — they’re small but mighty safety upgrades.
Personal Story: How Quickly Kickback Happens
During a Thursday night ladies’ woodworking session, one of the women was making bevel cuts on the table saw. Suddenly, the push shoe she was using shot back like a rocket and slammed into my wrist. The impact caused instant swelling, though by the end of the night the pain had subsided.
What shook me most was what I saw when I picked up the push shoe afterward: saw marks ran right across the spot where her fingers should have been. That was God’s mercy in action.
The lesson? Kickback happens fast. You only come into this world with ten fingers — work smart so you keep them.

The push shoe used that night. The pen and pencil point to where her hand would have been gripping the handle — you can clearly see the saw blade marks running right across that spot.
See more table saw-specific precautions in our Table Saw Safety guide.
5. Pay Attention to Dust Collection and Ventilation
Sawdust isn’t just a hassle to clean up. It’s bad for your lungs and can lead to serious respiratory problems if you breathe it in regularly. Some woods, like walnut and exotic species, are even irritating or toxic for certain people.
Use a proper dust mask or reusable respirator when sanding or cutting a lot of material. It keeps the wood dust out of your lungs where it doesn’t belong.
Invest in, or DIY, a basic dust collection system that attaches to your larger saws and sanders.

My Delta dust collector connected to an Oneida Dust Deputy cyclone separator, with ducting run to each of the major machines in the shop.
Make sure your shop has good airflow, either through a window, fan, or open doors when the weather’s right.
Use a respirator rated for finishing when applying stains, paints, or clear coats. The fine particles and vapors from finishes and solvents often present greater health risks than ordinary wood dust — so always use respiratory protection and good ventilation, especially when spraying.
Pro Tip: I keep my RZ dust mask handy for all work around the shop, and a full vapor-rated respirator right at my finishing area. Masks within reach get used more — set them where you’ll see them and you’ll protect yourself every time.
If you’re short on space or budget, even a simple shop vacuum hooked up to your tools is better than nothing. Over time, minimizing airborne dust helps both your health and your shop’s cleanliness. Plus, a cleaner workspace makes finishing projects easier and more professional looking.

Keeping sanding dust under control is crucial. Here, one of my shop vacuums with a small Oneida Dust Deputy is hooked up to my random-orbit sander — it makes a huge difference for both shop cleanliness and lung health.
Paying attention to ventilation matters even if you only woodwork as a hobby. Good airflow not only helps keep dust from building up in your lungs, it also lets finishes dry properly and keeps your shop comfortable year round. And if your shop is in the basement or garage, it keeps dust and fumes from spreading into the rest of the house — which helps keep the peace with your spouse, too.
6. Unplug Tools Before Blade or Bit Changes
No matter how many times I remind myself, the urge to swap a blade or bit without unplugging the tool can sneak up — especially when I’m in a rush. But leaving a tool plugged in, even when it’s “off,” is one of the most common causes of shop injuries.
- Before changing a saw blade, router bit, or even a drill bit, unplug the tool. If it’s cordless, remove the battery.
- Double-check that the switch is off before plugging back in.
I’ve caught myself reaching for a blade change without unplugging more times than I’d like to admit. The one-second shortcut isn’t worth the weeks you could spend recovering from an avoidable accident.
Unplug first, then touch the tool. Build the habit and you’ll never be caught off guard — or fingerless.
It only takes a second, but unplugging your tools is a basic part of shop safety for beginners and veterans alike. Make it muscle memory, just like buckling your seatbelt or flipping off the lights when you leave a room.
7. Avoid Loose Clothing and Jewelry
Loose sleeves, jewelry, and even untied long hair can get caught in spinning tools in a millisecond. My oldest sister learned that the hard way years ago. She was cleaning her juicer when her long hair got caught in the spindle. A huge chunk was ripped out of her head. She was lucky that was all that happened. In a woodworking shop, accidents like that can happen just as fast — and the consequences can be far more serious.
Roll up your sleeves, tie back long hair, and take off jewelry like watches and rings before you start.
For some tasks, gloves can help protect against splinters, but never wear gloves near spinning blades; it’s safer without them.
Wear close-fitting, comfortable clothing. Tuck in shirt tails and hoodie strings.
Warning: Spinning blades and bits don’t care what they catch — cloth, hair, or jewelry. If it dangles, it’s dangerous.
Proper shop clothing isn’t about fashion; it’s about keeping everything tight and out of the way. These small steps take only seconds but can prevent life-changing injuries. The right clothing choices go a long way to keeping you safe, and after a while, you won’t even notice the difference.
8. Never Work When Tired or Distracted
If I’m rushing to finish a project late at night or have one eye on my phone, my odds of making a mistake go way up. Woodworking demands focus, and even a split second of inattention can have rough consequences.
- Set your phone to do-not-disturb, shut the shop door, and let family know that you’re working with sharp stuff.
- If you’re tired, distracted, or stressed out, save the cutting for another time.
I’ve had nights where I nodded off in my recliner and realized later how dangerous it would’ve been if I had pushed myself to “just finish one more cut.” The shop isn’t the place to fight through fatigue.
Accidents don’t just happen when you’re new — most seasoned woodworkers hurt themselves when they’re tired, distracted, or rushing. If your hand wobbles or your head’s somewhere else, step away from the saw and recharge.
If you don’t want to leave the shop yet, pick a safer task instead: clean up, put tools away, sharpen hand tools, organize hardware, sit down and sketch a design, or flip through a woodworking book. There are plenty of productive things you can do that don’t put you in danger.
Projects can wait; your safety can’t. Working tired is one of the main causes of accidents, even for people who know every safety rule in the book.
Also, never work under the influence. Woodworking is best enjoyed with a clear head — save the relaxing beverage for when the tools are powered down and the cuts are done. Being sharp keeps everyone safer, especially if you have friends or family in the shop with you.
I sometimes set a timer when I know I’m getting tired. When it goes off, I either take a break or shut down the shop. That little safeguard has saved me from more than one close call.
9. Follow the “Safety First” Mindset
Woodworking safety tips aren’t just a checklist — they’re habits that build over time. I always stop to double-check measurements and setups before flipping a switch or making a cut, even if it slows me down. That extra pause is when I catch little things that could have gone wrong, from clamp positions to fence alignment.

Don’t overlook safety at the router table. These simple hold-down rollers keep the workpiece flat against the table, help prevent kickback, and guide it snugly along the fence.
Take a breath and run through a quick visual check before every operation.
If something feels awkward or unsafe, rethink your setup or ask for advice online — woodworkers are generous with sharing tips.
If you ever have someone else in the shop, agree that either of you can call a time-out if something looks unsafe. A second set of eyes often catches what you miss.
Many of my mistakes have happened when my gut told me something wasn’t right and I ignored it. One time I drilled through a board not realizing my finger was right underneath. I didn’t drill deep into it, but it could have been avoided if I had stopped to think.
Know where your hands are at all times.
It’s not always the big table saw cuts that get you — sometimes it’s a quick drill press operation, a clamp under too much tension, or a handheld drill slipping. Treat every step with the same respect.
Building good safety habits means more time enjoying woodworking and less time dealing with accidents. Teaching these habits to others in your shop, especially young aspiring woodworkers, helps everyone go home intact at the end of the day.
The safest woodworkers aren’t fearless — they’re the ones who build a habit of pausing, checking, and asking questions before each cut.
Your “safety first” mindset is a commitment to yourself and anyone you woodwork with. Encourage others to speak up with their own tips or concerns so your shop stays a safe, welcoming place. Keeping an eye out for each other never goes out of style.
Tips for Building Your Woodshop Safety Routine
Safe woodworking doesn’t mean stressing over every detail. It’s about forming habits around the basics. Here’s a quick checklist I keep handy near my workbench:
- Gear up first: goggles, ear protection, and dust mask on before you even touch the switch.
- Coil cords and clear the floor so you don’t trip mid-cut.
- Unplug before blade or bit changes — every time.
- Store sharp tools safely so you don’t cut yourself reaching blindly for a chisel or router bit.
- Work in good lighting with a comfortable layout.
I keep my safety gear close at hand. A quick glance before starting a machine reminds me to gear up.
Following safety rules makes woodworking more relaxing and lets you focus on your craft instead of worrying about what might go wrong. If you’re serious about enjoying the hobby for years, print out your own safety checklist and hang it on the wall. Over time, the routine becomes second nature, and you’ll set a great example for anyone who visits your workspace.
Accidents can still happen, even if you’re careful. That’s why it pays to be prepared: keep a first aid kit within easy reach, know where your phone is during emergencies, and have emergency contacts handy. Even seasoned woodworkers run into the occasional scrape or splinter — preparation keeps small problems from becoming big ones.
Final Thoughts
That Thursday night kickback in my shop could have ended a lot worse. I was lucky to walk away with a sore wrist instead of watching someone lose their fingers. And it’s not just personal injuries to worry about — kickback has real power. I once saw a video where a 2×4 shot off a table saw so hard it punched through a drywall wall ten feet away. Imagine if a person had been standing there.
Accidents happen fast, and safety rules aren’t just for beginners — they protect everyone in the shop. Woodworking is supposed to be rewarding, creative, and fun. The best way to keep it that way is by building safe habits into every project.
Safety isn’t about being scared — it’s about being smart. Protect yourself, protect the people you share your shop with, and you’ll have more good days at the bench than bad ones. Safe habits prevent woodworking injuries and keep the craft rewarding for years to come.
👉 What about you? Have you ever had a close call that changed the way you work? Drop your top shop safety tip or story in the comments — we can all learn from each other.
Additional Items shown in article
- Sommerfeld Tools Feather Guard
- Feather-Loc stacking featherboards
- Bow Products stacking featherboards (my favorites)
- MicroJig Grr-Ripper System from Taylor Toolworks (Also available on Amazon)
- MicroJig Grr-RIP Block Push Block
- Milescraft GrabberPLUS
- Milescraft Grabber
- General push block
- Fastcap Orange Magnetic push stick (I like this one with the magnet on the end. It stands up on my table saw ready to grab.
- Basic push stick
- Honeywell Uvex Bionic Face Shield
- Disposable Dust masks (Similar to mine on Amazon)
- Ear Plugs
- Safety Glasses (Buying them in multi-packs lets you keep a pair at each machine so you never forget them.)
- Over the glasses Safety Glasses
- Safety ear muffs
- Rubbermaid Brute garbage can for collecting wood chips. (Don’t skimp here—cheaper plastic cans will collapse under the suction of a full-size Dust Deputy.)
- Dust Collector (This Shop Fox model is very similar to the Delta one I show in the pictures.)
- Ridgid Wet Dry Vacuum (The big vacuum shown at the far end of my shop photo; I use it for general cleanup, while a smaller unit is dedicated to the sander and freehand router.)
Mike’s Favorites
These are the tools I reach for on almost every project. The seven below are my quick-grab essentials—open the full list for everything I keep on the bench and in my apron.
Top 7 Essentials
- iGaging 6″ Fastener Cal Digital Caliper — Quick, precise checks.
- iGaging 7” and 12” Layout Square Set (also available at Taylor Toolworks) — Reliable layout reference.
- Starrett 6″ Double Square — Everyday layout accuracy.
- Woodcraft 16 ft Tape Measure (Fractional) — Compact; blade stays out on its own.
- Taytools Stainless Steel 6″ Machinist Ruler (4R) — My most-used small measuring tool.
- RZ Mask M2 9-Piece Woodworker’s Kit — Reusable protection against fine dust; far more comfortable than disposables (also available at Amazon).
- ISOtunes PRO 3.0 Bluetooth Hearing Protection — OSHA-certified hearing protection with streaming and calls.
➤ See my full list of Favorites
On the Bench Tools
- iGaging IMPERIAL Bench Squares – Stainless steel blades with wide anodized aluminum base.
- iGaging 7” and 12” Layout Square Set – Anodized aluminum (also available at Taylor Toolworks).
In My Apron Tools
- Katz-Moses 20 oz Waxed Canvas Tool Apron (The apron isn’t in my apron—LOL—but I’d be lost without it.)
- iGaging 6″ Fastener Cal Digital Caliper
- 6-Pack Mechanical Carpenter Pencils with Sharpener and Refills
- Pentel GraphGear 1000 Mechanical Pencil
- Calculated Industries 4019 Material Estimator Calculator
- Woodcraft 16 ft Tape Measure (Fractional) or FastCap Old Standby 16 ft (also at Taylor Toolworks). I prefer the Woodcraft because it’s smaller and the blade stays out on its own. The FastCap works too, but you have to lock and release the blade each time.
- Starrett 6″ Double Square – Hardened graduated blade.
- Starrett 4″ Double Square – Satin chrome finish, hardened blade.
- iGaging 4″ & 6″ Double Square Set (also at Taylor Toolworks). I was gifted my Starrett squares and treasure them, but this iGaging set is a well-made, affordable alternative I’d recommend if you’re buying your own.
- Lufkin Red End Extension Folding Rule (5/8″ × 6 ft) or Crescent Lufkin Wood Rule (6′ Brass Extension). I keep a folding rule for places a tape can’t manage—checking inside a box for square, or when I need a longer, rigid measure. Get one with a brass extension so you can capture full measurements when another arm won’t swing into place.
- Taytools Stainless Steel 6″ Machinist Ruler (4R) Even with other measuring tools, this little rule probably gets used the most.
- EverBrite 9-LED Flashlight, 6-Pack (Assorted Colors)
- Mikov Thin Blade Dual Bevel Marking Knife (0.060″, Rosewood Handle)
- Narex Thin Blade Dual Bevel Striking Marking Knife (also at Amazon). Yes, I carry two knives: this one’s longer for reach where the Mikov can’t go.
Shop Safety Essentials
- RZ Mask M2 9-Piece Woodworker’s Kit — Breathable, reusable, and essential for sanding/cutting (also available at Amazon).
- ISOtunes PRO 3.0 Bluetooth Hearing Protection — OSHA-certified hearing protection with streaming and calls.
Some links above are affiliate links. Thanks for supporting The Master’s Workshop of WI!
This list is updated as I refine my shop setup and favorite tools.
Great tips!
Thanks, George,
You’re absolutely right, we can never be too careful about safety in the workshop.
Glad you enjoyed the article, and I hope you find a few other tips and ideas around the site that you like too.
Mike G¹