Starting your first woodworking project can feel a little intimidating—especially when you’re staring at a fresh board and wondering where to begin. I’ve been there. My first time at the workbench, I wasn’t sure which end of the tape measure to trust. But that first project? It taught me more than any book could.
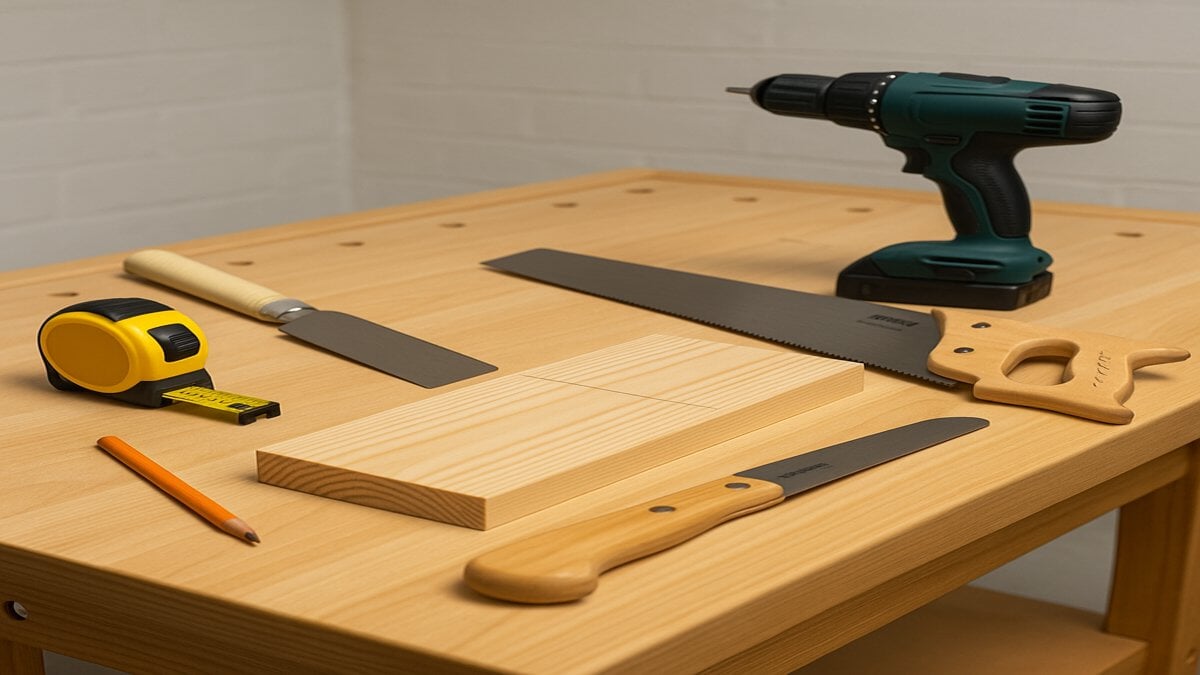
Everything you need for your first woodworking project—laid out and ready to go.
Whether you’re dreaming of building a shelf, a birdhouse, or just want to learn the basics, this guide will walk you through everything step by step—with plain talk, practical tips, and zero pressure. You don’t need a fancy shop or expensive tools—just a bit of patience, some simple supplies, and the curiosity to try something new.
We’ll keep things easy, hands-on, and confidence-building. By the end, you’ll have a finished project to show off—and maybe even catch the woodworking bug.
Step 1: Pick a Simple First Woodworking Project
The key to your first woodworking win? Keep it simple.
A lot of beginners get stuck trying to make something too complex right away. I recommend picking a project that’s small, practical, and can be finished in a weekend. The goal here isn’t perfection—it’s momentum. You want that first success under your belt so you feel ready for the next.
Good Beginner Woodworking Projects:
- Small bookshelf
- Simple storage box
- Rustic picture frame
- Birdhouse or planter box
- Coat rack or wall-mounted shelf
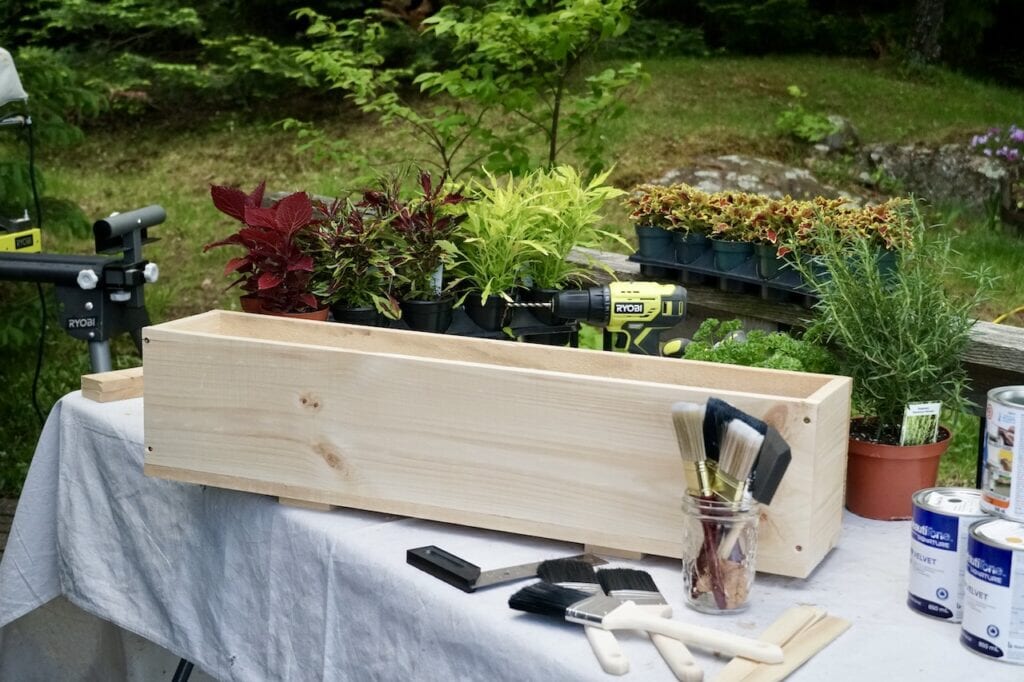
Here’s a great example of a simple and free planter box project from Weekend at the Cottage. Visit their site for full instructions and materials!
Look for free or low-cost plans that list the cuts and tools needed—YouTube, Woodsmith, and Woodworker’s Journal are great places to start. A good plan takes out the guesswork and gives you confidence at every stage.
Before choosing, ask yourself:
- Do I want this to be decorative, useful, or both?
- Do I have space to build and store it?
- What tools do I already have?
- How much time can I realistically spend on this?
If it checks those boxes and excites you a little? That’s the one. You can always build something fancier later.
When you click and buy through our links, you’re not only upgrading your woodworking game but also supporting The Master’s Workshop of WI—at no extra cost to you. It’s a win-win: you get the best tools, and we keep bringing you top tips and content!
The right project plan makes your first build a lot smoother. Look for plans that include a tool list, cut list, and step-by-step instructions or diagrams. These trusted sources offer free or beginner-friendly plans worth checking out:
- Ana White — simple furniture plans, very beginner-oriented
- BuildSomething (Kreg) — project plans with cut lists & joinery notes
- Family Handyman — clear DIY plans with photos/diagrams
- Rockler — project ideas and downloadable plans
- Wood Magazine — vetted, detailed project plans
- Woodworkers Guild of America (WWGOA) — tutorials + plans
- DIY Pete — approachable, tool-light builds
📺 YouTube Channels to Check Out:
- 731 Woodworks (Matt Outlaw) – Beginner-friendly projects, tool reviews, and clear how-to videos.
- Stumpy Nubs (James Hamilton) – Smart woodworking tips, tool reviews, and shop setup ideas.
Try searching “free beginner woodworking project PDF” for printable plans with cut lists you can take right to your workspace.
Step 2: Gather the Right Tools and Materials
Let’s talk tools—without breaking the bank.
Most beginner projects only need a few basics. For my first few builds, I used hand-me-downs and budget tools from the local hardware store—and they worked just fine. Start simple. Upgrade later.
🔧 Beginner Tool Checklist:
- Measuring tape & pencil
- Speed square (for straight corners)
- Handsaw or circular saw
- Power drill with assorted bits
- Sandpaper or sanding block
- Clamps
- Hammer
- Screwdriver (manual or cordless)
A few extras like wood glue and a countersink bit come in handy, but aren’t must-haves.
A speed square is a small, triangle-shaped tool that helps you draw straight lines, mark angles, and check corners for square. It’s one of the handiest layout tools in any shop—simple, affordable, and beginner approved.
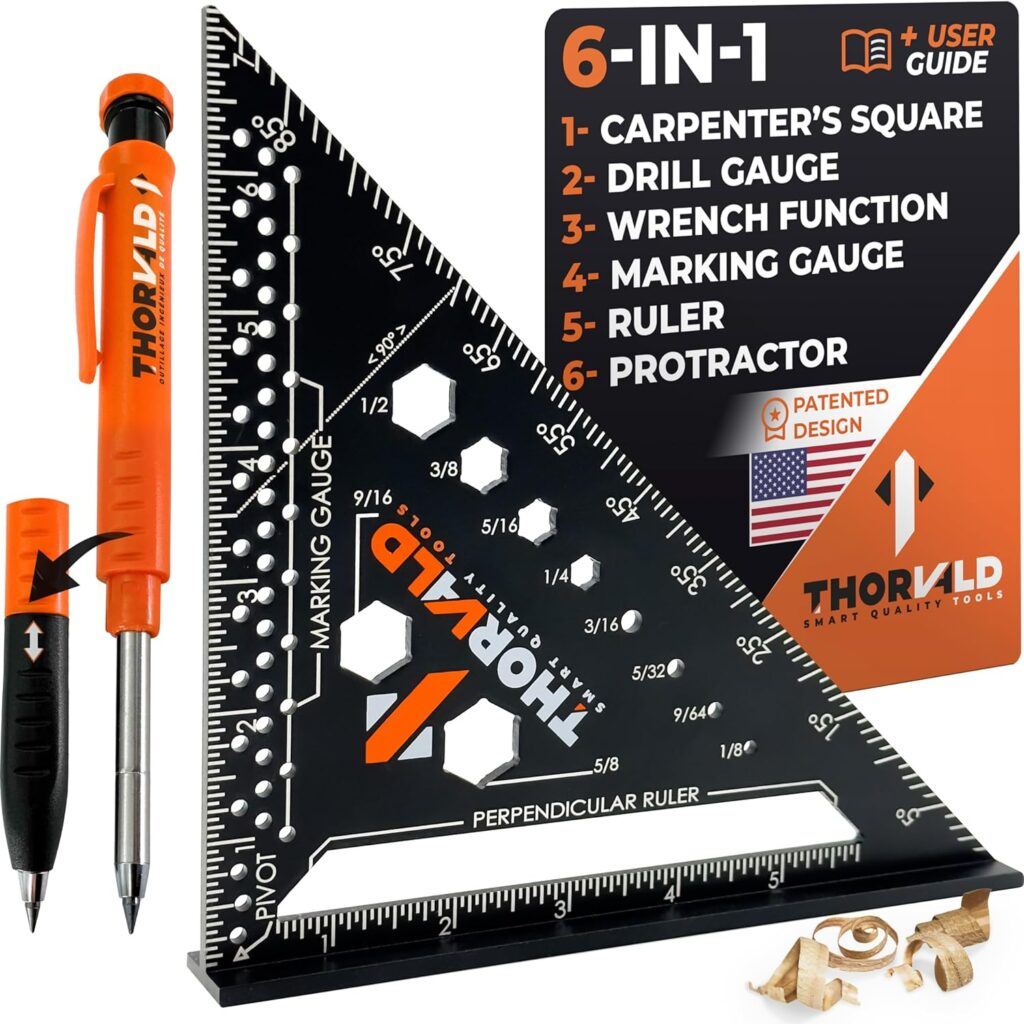
This THORVALD 6-in-1 Speed Square is a versatile tool perfect for beginners—combining a square, ruler, protractor, drill gauge, and more into one durable layout tool. The speed squares I personally use are from Taytools Speed squares. Take a peek at them here if you’re looking for top-tier precision.
What Wood Should You Use?
- Pine is cheap, soft, and easy to cut.
- Poplar is also beginner-friendly.
- Look for straight, flat boards with minimal knots.
- Pre-sanded or precut wood saves time but may cost a bit more.
Bring your cut list to the store and don’t be shy—staff are usually happy to help beginners. Many stores even offer free or low-cost cuts right there.
Step 3: Prepare Your Workspace
Once you’ve got your tools and wood, the next step is getting your space ready for the fun part.
Having a clear, organized workspace helps you avoid mistakes and finish your project more smoothly. I remember tackling my first woodworking job on a dining table. It had battle scars to prove it—much to my wife’s dismay.
Setting Up Your Work Area:
- Choose a space with good lighting
- Cover your table or bench with cardboard or scrap boards
- Keep tools within reach, but tidy
- Lay out materials in the order you’ll use them
- Put on some music or a podcast to stay focused
If you’re working indoors, open a window or use a small fan while sanding or cutting. And always wear safety glasses and a dust mask, even for small projects. You only get one set of eyes and lungs.
Step 4: Measure and Mark Your Cuts
Tips for Accurate Measuring:
- Read your project plans carefully. Double-check the cut list.
- Mark each piece clearly with a sharp pencil.
- Use a speed square for straight lines and perfect corners.
- Check your tape measure twice. “Measure twice, cut once” is classic advice for a reason!
Draw light lines for cut marks and cross out scraps so you don’t accidentally cut the wrong end. It happens, I know. 😜 I always number my parts as I mark them—especially with multi-part projects. It keeps you sane when the bench starts filling with offcuts.

Marking a 90-degree cut line on a board with a speed square.

Marking a 45-degree miter line on a board using a speed square.

Board with clearly visible layout lines after measuring and marking. They may look faint in photos, but in your shop they need to be bold enough for accurate cutting.
Step 5: Make the Cuts – Slow and Safe
Cutting your wood can feel a little nerve-wracking at first. Even now, I double-check my marks before I ever touch a saw. A handsaw is easier to control for small cuts, but a circular or miter saw is great if you have access.
I built my first bookcase with just a handsaw, hammer, and nails—35 years later, it’s still being used. It’s not any prettier, but it’s still standing. That’s the beauty of woodworking: it doesn’t have to be perfect to be useful.
Beginner Friendly Cutting Tips:
- Line up the saw blade just outside your pencil line
- Clamp your wood for stability before cutting
- Work slowly—let the tool do the work
- Always keep your fingers well clear of the blade
If your cuts aren’t perfect, don’t worry. Sanding and assembly will clean up small mistakes. Slightly uneven edges rarely show in the final product.
Step 6: Smooth Edges and Surfaces by Sanding
🧰 Sandpaper Grit Guide for Beginners
Sandpaper is numbered by “grit”—how coarse or fine it is. Lower numbers like 60–80 are rough and aggressive, while higher numbers like 180–220 are smooth and gentle.
- Coarse (60–80): Removes material fast
- Medium (100–150): Great for general prep
- Fine (180–220): Final sanding before finish
➡️ Work your way up gradually—don’t jump straight from 80 to 220. Each step preps the wood for the next.
Sanding removes rough spots, evens edges, and preps the wood for a clean finish. I usually start with 80 or 120 grit, then work my way up to 180 or 220 depending on the finish.
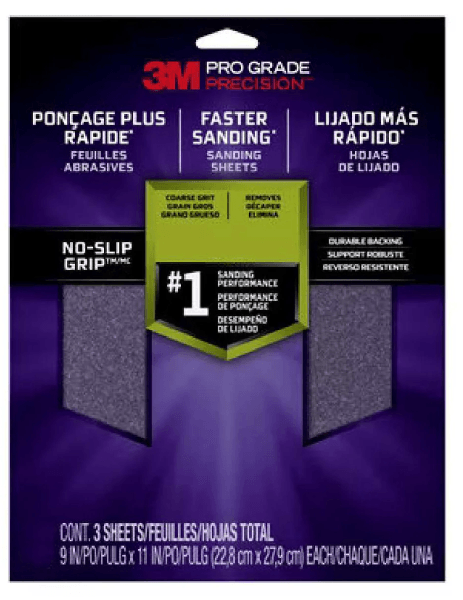
These 3M Pro Grade sanding sheets are a reliable choice for beginners—easy to grip, long-lasting, and available in all the essential grits. For extra comfort and control, I recommend using a Taylor Tools sanding block to hold your paper and protect your fingers.
When starting with rough wood, you can sand across the grain in early stages—it removes material faster. But before moving to the next grit:
- Always make a few passes with the grain to erase cross-grain scratches
- Step through grits gradually: 80 → 120 → 150 → 180 → 220
- Don’t skip more than one level between grits
- Wipe off the surface before switching grits—leftover coarse particles can cause scratches that only show up after finishing (Don’t ask me how I know that 😄)
🎨 Finishing Tip:
Stop at 180 if you’re painting. Go up to 220 if you’re staining or sealing with a clear coat.
“Just don’t do this inside your house. Your wife might not be as into woodworking—or wood dust—as you are.”
Step 7: Assemble Your Project with Care
This is the fun part—your pile of parts turns into a real object. Read your plans one more time before reaching for the glue.
Assembly Basics for New Woodworkers:
- Use wood glue and clamps for joints
- Clamp everything in position before adding screws or nails while the glue is still wet
- Pre-drill holes to prevent splitting
- Double-check for square corners before final tightening
- Wipe off glue squeeze-out with a damp rag
Glue strengthens the joint, and clamping helps keep things square while you fasten everything in place.
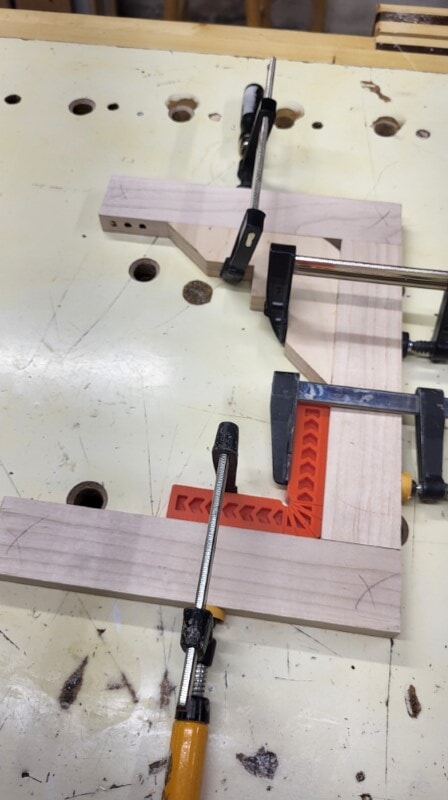
A corner clamp keeps joints aligned while the glue sets — a handy helper for beginners. You can buy corner clamps or make your own, like the mix shown here.
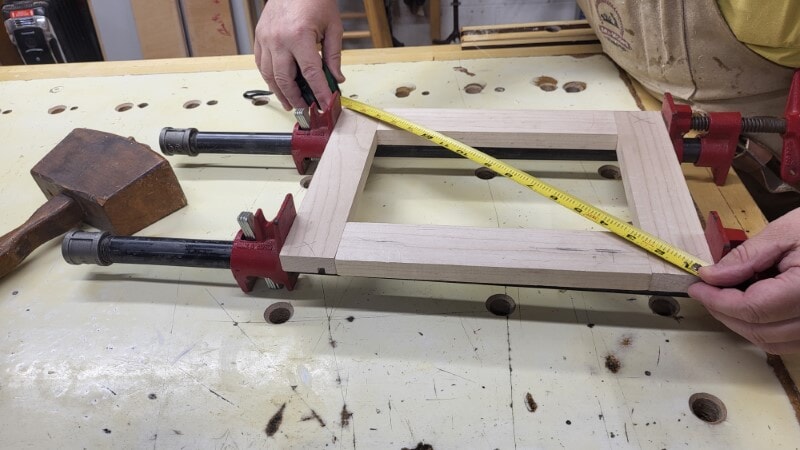
Frame clamped with two pipe clamps. Always measure corner-to-corner diagonally — if the two measurements don’t match, your project isn’t square.
Step 8: Finish Your Project – Stain, Paint, or Seal
Finishing brings your project to life. Even a quick coat of stain or poly gives it a professional look and adds durability.
Popular DIY Wood Finishes:
- Polyurethane – Durable, water-resistant
- Shellac – Fast-drying and easy to use
- Spray lacquer – Smooth and quick but best outdoors
- Paint – Great for color or covering imperfections
Follow directions on the can, and apply light coats in a well-ventilated space. Let each coat dry completely.
There are several ways to finish your project depending on its purpose:
- Polyurethane – Tough and water-resistant. Great for furniture
- Shellac – Easy and fast, best for decorative builds
- Spray lacquer – Quick-drying, smooth finish
Woodworker’s Insight: My First Bookshelf
No first woodworking project goes perfectly—and that’s completely normal. Half the fun is figuring out what works (and what doesn’t).
My first real build was a tall bookshelf I made back in Ogdensburg. I needed storage next to my desk, so I grabbed a couple of pine 1×12s, cut them with a handsaw (not perfectly, but close enough), and nailed in eight shelves straight through the sides. No dados, no brackets, no back, no bracing—and definitely no plan. Then I slathered it in dark stain and called it good.
Over the years, that shelf moved with us, got cut in half to fit shorter ceilings, and eventually received a full makeover—braces, backs, and a better layout. But 35+ years later, that rickety old shelf is still in use. It reminds me how far I’ve come, and that woodworking doesn’t have to be perfect to be useful.
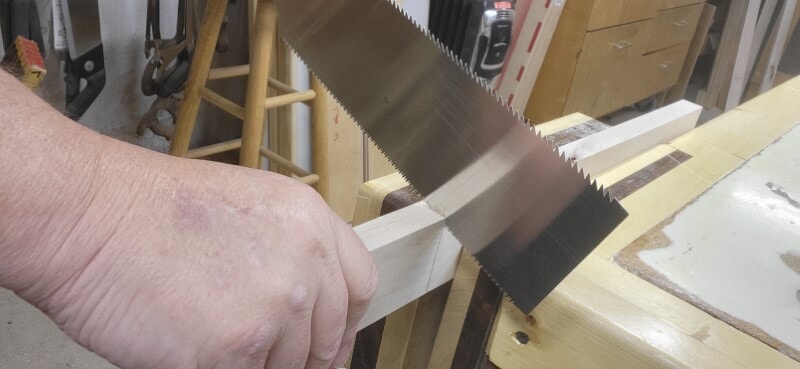
Using a handsaw is one of the best ways to understand the fundamentals of safe, accurate cutting. Practice with scrap wood and focus on three keys:
- Grip: Hold the handle firmly but not in a death-grip—let the saw do the work.
- Angle: Start with a shallow angle (about 30°) to guide the cut before moving into full strokes.
- Rhythm: Use long, smooth strokes—avoid short, choppy motions that bind the blade.
🛠️ No Tools? No Workshop? No Problem.
Don’t let a lack of tools or space hold you back. Here are some ways to get started without a full shop:
1. Use a Community Workshop or Co-Op
Many cities have shared woodshops you can rent. They’re usually well-stocked—and full of people who love helping beginners.
2. Ask a Friend Who Woodworks
Most woodworkers are happy to teach. I’ve helped many people learn right in my own shop. You probably know someone who’d love to lend a hand.
3. Borrow or Rent Tools
Equipment rental shops often carry saws and drills. Just be sure to plan ahead and return borrowed tools in the same condition. Nothing discourages generosity like getting back a broken tool.
4. Buy a Pre-Cut Kit
Some kits come ready to assemble—cut pieces, fasteners, and instructions included. It’s a great way to build confidence without needing your own saws.
Don’t let a lack of tools stop your creativity. The heart of woodworking isn’t in the equipment—it’s in the doing.
❓ Frequently Asked Questions
What tools do I need to start woodworking?
A measuring tape, saw, drill, screwdriver, clamps, and sandpaper will handle most beginner jobs. Start with basics and build from there.
How do I pick good wood for my first project?
Pine and poplar are both affordable and easy to work with. Look for straight, clear boards with minimal knots or warping.
Do I need a workshop or fancy tools to make something that lasts?
Nope! My first few projects were built in a dining room with basic tools and a lot of patience. If you use glue and fasteners and take your time, your project can last for years—just like my old bookshelf.
✅ What’s Next?
Finishing your first project feels great. Don’t be surprised if you’re already dreaming of your next build.
🧰 Your Next-Step Checklist:
- Pick a small project that excites you
- Print your plan and make a shopping list
- Take your time—don’t rush
- Ask for help if you get stuck
- Enjoy the process and show off what you made!
Woodworking isn’t about perfection. It’s about learning, creating, and building confidence one piece at a time. If you’ve got questions or want to share your first project, drop a comment—I’d love to hear about it!
Mike’s Favorites
These are the tools I reach for on almost every project. The seven below are my quick-grab essentials—open the full list for everything I keep on the bench and in my apron.
Top 7 Essentials
- iGaging 6″ Fastener Cal Digital Caliper — Quick, precise checks.
- iGaging 7” and 12” Layout Square Set (also available at Taylor Toolworks) — Reliable layout reference.
- Starrett 6″ Double Square — Everyday layout accuracy.
- Woodcraft 16 ft Tape Measure (Fractional) — Compact; blade stays out on its own.
- Taytools Stainless Steel 6″ Machinist Ruler (4R) — My most-used small measuring tool.
- RZ Mask M2 9-Piece Woodworker’s Kit — Reusable protection against fine dust; far more comfortable than disposables (also available at Amazon).
- ISOtunes PRO 3.0 Bluetooth Hearing Protection — OSHA-certified hearing protection with streaming and calls.
➤ See my full list of Favorites
On the Bench Tools
- iGaging IMPERIAL Bench Squares – Stainless steel blades with wide anodized aluminum base.
- iGaging 7” and 12” Layout Square Set – Anodized aluminum (also available at Taylor Toolworks).
In My Apron Tools
- Katz-Moses 20 oz Waxed Canvas Tool Apron (The apron isn’t in my apron—LOL—but I’d be lost without it.)
- iGaging 6″ Fastener Cal Digital Caliper
- 6-Pack Mechanical Carpenter Pencils with Sharpener and Refills
- Pentel GraphGear 1000 Mechanical Pencil
- Calculated Industries 4019 Material Estimator Calculator
- Woodcraft 16 ft Tape Measure (Fractional) or FastCap Old Standby 16 ft (also at Taylor Toolworks). I prefer the Woodcraft because it’s smaller and the blade stays out on its own. The FastCap works too, but you have to lock and release the blade each time.
- Starrett 6″ Double Square – Hardened graduated blade.
- Starrett 4″ Double Square – Satin chrome finish, hardened blade.
- iGaging 4″ & 6″ Double Square Set (also at Taylor Toolworks). I was gifted my Starrett squares and treasure them, but this iGaging set is a well-made, affordable alternative I’d recommend if you’re buying your own.
- Lufkin Red End Extension Folding Rule (5/8″ × 6 ft) or Crescent Lufkin Wood Rule (6′ Brass Extension). I keep a folding rule for places a tape can’t manage—checking inside a box for square, or when I need a longer, rigid measure. Get one with a brass extension so you can capture full measurements when another arm won’t swing into place.
- Taytools Stainless Steel 6″ Machinist Ruler (4R) Even with other measuring tools, this little rule probably gets used the most.
- EverBrite 9-LED Flashlight, 6-Pack (Assorted Colors)
- Mikov Thin Blade Dual Bevel Marking Knife (0.060″, Rosewood Handle)
- Narex Thin Blade Dual Bevel Striking Marking Knife (also at Amazon). Yes, I carry two knives: this one’s longer for reach where the Mikov can’t go.
Shop Safety Essentials
- RZ Mask M2 9-Piece Woodworker’s Kit — Breathable, reusable, and essential for sanding/cutting (also available at Amazon).
- ISOtunes PRO 3.0 Bluetooth Hearing Protection — OSHA-certified hearing protection with streaming and calls.
Some links above are affiliate links. Thanks for supporting The Master’s Workshop of WI!
This list is updated as I refine my shop setup and favorite tools.