If you spend any time in a woodworking shop, you know the table saw can be both your best friend and your biggest headache. There’s a special kind of satisfaction in pushing clean boards through the blade and watching a project come together, but I’ve also learned (sometimes the hard way) that respecting the saw is non-negotiable. Even seasoned pros get caught off guard if they let their focus slide.
Whether you’re just getting comfortable with your first table saw or you’ve been running lumber for decades, some safety basics always deserve a fresh look. Here’s a straightforward guide to staying safe at the table saw, based on a combination of real-world lessons, reliable shop wisdom, and a few “wish I’d known that” moments. This is the stuff I rely on every single time I power up the saw.
Why Table Saw Safety Is Really Important
The table saw isn’t just the centerpiece of most shops; it’s also one of the most common sources of workshop injuries. Even a minor mistake can mean a ruined project, or worse, a ruined day and a trip to the ER. Getting comfortable with safety habits turns the saw into a productive tool instead of a risk. And honestly, even folks who know what they’re doing can slip up, especially when they’re tired or rushing to finish a project.
Beyond immediate injuries, keeping safe at the table saw helps set the right tone for your whole shop. It shows visitors and less-experienced woodworkers that safety is always the rule, no matter how experienced you are or what job you’re doing. Good habits stick, and sometimes your example helps stop an accident before it starts.
Wear the Right Safety Gear Every Time
Before even touching the power switch, I make it a habit to gear up. Safety glasses are a must; sawdust and splinters move fast and don’t give you a second chance. Ear protection is just as important. Table saws put out enough noise to mess with your hearing over time. I’m personally a fan of earplugs, but ear muffs work just as well if you use them right. I use Isotunes Bluetooth earplugs. This way my ears are protected and I can listen to my favorite music or book while I work.
Don’t skip the dust mask or respirator either, especially with certain woods and any plywood that might contain glues. A fine layer of airborne sawdust may not seem dangerous at first, but it can build up in your lungs and cause real problems. Good ventilation and proper dust extraction help, but nothing beats keeping your mouth and nose protected if you’re ripping a ton of material.
Loose clothing, dangling jewelry, and long untied hair can all catch on spinning parts or the wood itself. Roll up those sleeves, tie your hair back, and take off any rings or bracelets before starting. Taking just a few seconds to do this will let you focus entirely on your work and avoid unnecessary risks.
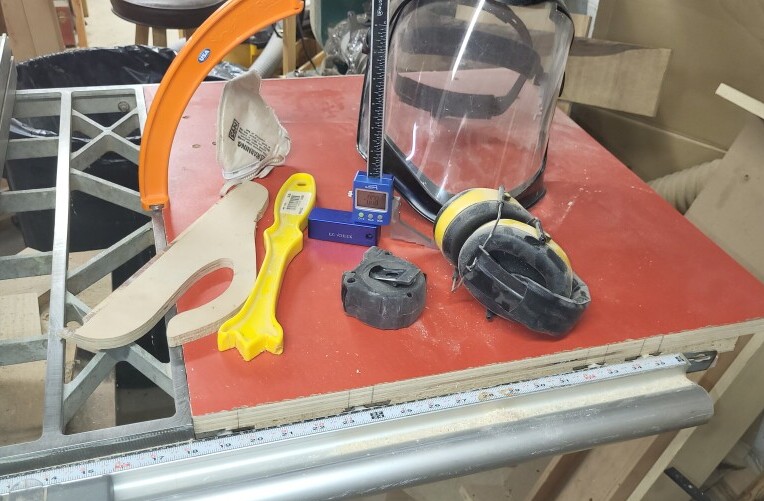
These are some of the safety and setup tools and gear that I always keep at my table saw. I like a full-face safety mask as it doesn’t fog up my glasses. Note the various push sticks and shoes. I have many more. If I’m not wearing my Isotune earplugs, these muffs do a great job of reducing the noise. The simple dust mask is easy and quick to put on.
I use the RZ Mask for most sanding and cutting jobs. It’s lightweight, doesn’t fog up my glasses, and offers great protection—especially when working with fine dust from a table saw or sander.
🧰 Pro Tip: Replace filters regularly and keep an extra on hand in your shop drawer.
Prep Your Workspace for Safe Cutting
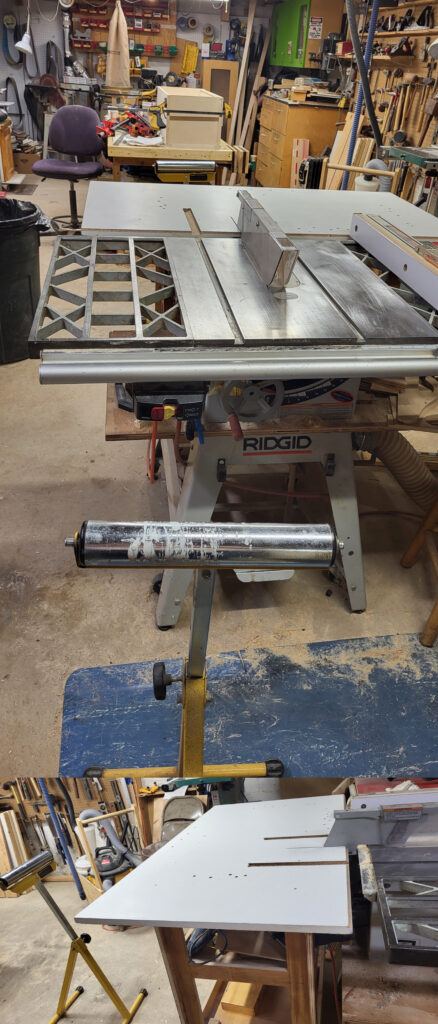
Top: A roller stand supports long stock during feeding. Bottom: An outfeed table with a support stand catches material after the cut. The outfeed can be a simple cart top or a dedicated extension.
A tidy and well-lit shop makes a big difference. It’s too easy to trip over scrap boards or reach for the wrong tool when your space is cluttered. I like to clear the area out before I get started; anything sitting on or around the saw table gets moved to a safe spot. I also check that the floor isn’t slippery—spilled glue or sawdust can turn it into a slip-and-slide fast.
Setting up solid outfeed support is worth the extra minute it takes. Roller stands, outfeed tables, or even a makeshift sawhorse go a long way in keeping stock steady. Wobbly material is a recipe for binding or kickback, so never overlook this setup. A little extra prep now saves you from trouble and frustration later.
One detail I never skip: making sure the fence lines up parallel with the blade. If it’s off even a smidge, wood can get pinched, burn, or kick back. A quick check with a reliable square or gauge saves trouble down the line. Also, make sure any miter gauges or sleds run smoothly without wobbling, since jarring movements during a cut can throw your workpiece off course.
Always Use the Blade Guard and Riving Knife
Blade guards sometimes get a bad rap for being fussy, but they’re there for a reason. I get that certain cuts won’t allow for their use, but whenever possible, I keep mine in place. Not only does it provide a shield for stray hands or sleeves, but most modern blade guards also help control dust over the cutting area.
The riving knife is a feature I never want to be without. Its job is to keep the freshly cut wood from pinching back together on the blade, which can cause nasty kickback. Unlike a splitter (which sits fixed behind the blade), a riving knife moves up and down with your blade, always staying at the right height to do its job properly. For most everyday rips and crosscuts, keeping the knife in place is just extra peace of mind.
The importance of preventing kickback can’t be overstated. Kickback happens in a flash, and the workpiece can shoot backward with incredible force. Even a small board can bruise you or worse. Consistently using your riving knife or splitter gives you another layer of protection and helps keep cuts on track.
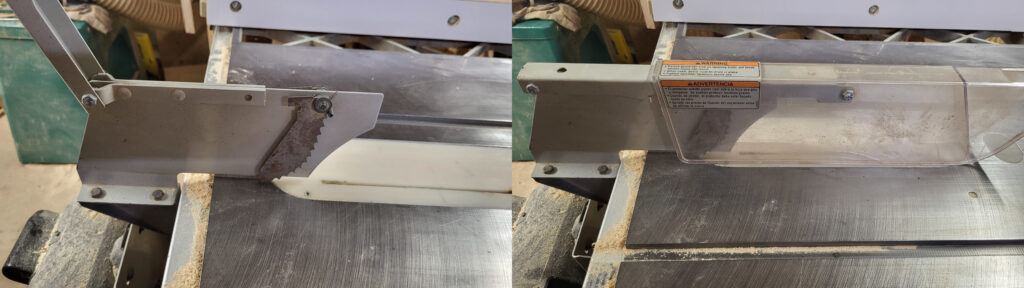
Splitter assembly on my Ridgid saw. Left: blade guard raised to show anti-kickback pawls attached to the splitter. Right: blade guard, splitter, and pawls working together to prevent kickback. The splitter is removed only for non-through cuts like dadoes or rabbets and reattaches easily using a thumb screw.
Riving Knife vs. Splitter: What’s Better?
Modern table saws are equipped with either a splitter or a riving knife to help prevent kickback. A splitter is a stationary metal fin that stays behind the blade to keep the kerf from closing on the blade. A riving knife, on the other hand, moves up and down with the blade, staying close to it during cuts. That makes it far more versatile—especially for non-through cuts like grooves, dadoes, and bevels.
“I’d swap out my older saw just to get a riving knife—that’s how much safer it makes things.”
I’ve used saws with both options, and I’m firmly in the riving knife camp. Splitters combined with anti-kickback pawls work fine for basic tasks, but they often get in the way when doing more complex cuts. The riving knife’s ability to follow the blade height means you don’t have to remove it nearly as often—and that’s a big deal for safety and convenience. Most newer saws come with one by default, and honestly, I’d swap out my older saw for this feature alone if I could.
Get the Blade Height Right
Setting blade height isn’t just about getting a good cut. It’s a big part of keeping things safe. I keep my blade so that the gullets of the teeth (the space between the tips) are just above the surface of the wood, usually about 1/4 to 1/2 inch higher than what I’m cutting.
“Set your blade height so the gullets just clear the top of your board—usually ¼″ to ½″.”
This position is high enough for an efficient cut but low enough to reduce the amount of exposed blade if something goes wrong. Raising the blade higher than needed increases the risk, while lowering it too much can burn the cut or bind the wood.
Making sure the blade is properly tightened before making cuts is also part of this safety step. Loose blades can vibrate and throw off your cut, adding unnecessary hazards to what should be a straightforward task. Double-check those adjustments every time you switch blades or materials.
Push Sticks and Push Blocks: Keep Your Hands Out of Harm’s Way
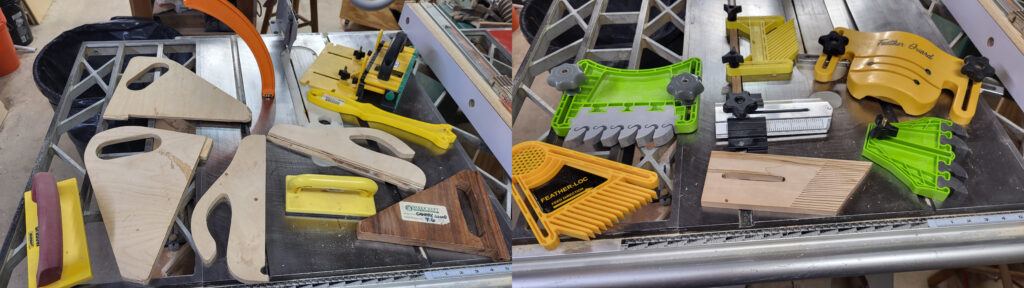
Left: Assorted purchased and homemade push sticks, blocks, and push shoes. Right: Various featherboards for holding work tight to the fence. Always position featherboards before the blade—not alongside or after it—to avoid binding and possible injury.
Featherboards aren’t just safer—they also make your cuts smoother and more consistent.
If you work with small pieces or make narrow cuts, using a push stick isn’t just a good idea; it really saves your fingers. I reach for a push stick or push block any time my hands might get close to the blade, especially for anything under about four inches of width. This habit quickly becomes second nature and lets me tackle detailed work without risking my fingers.
I keep a mix of shopmade push blocks and storebought push sticks right by the saw. They only take a second to use and really lower the stress of tricky cuts. The main thing is keeping hands and fingers above the blade, never alongside it. That simple habit goes a long way. For super thin or short pieces, a featherboard can help apply even pressure and keep wood against the fence without risking your hands.
Use the Right Posture and Stand in a Safe Spot
Where you stand matters more than most people think. I keep myself just to the left of the blade (since I’m right-handed), rather than directly behind it. Standing directly behind the blade puts you in the line of fire for any kickback. By standing off to the side, you’re out of the path if the workpiece decides to launch back unexpectedly.
Keep your body balanced and your feet planted in a way that you don’t have to overreach. This posture keeps you steady and gives you control over the board. Leaning or stretching across the saw can make everything feel unstable. If I’m working on larger pieces, I’ll do a slow dry run just to be sure I can guide the material safely from start to finish.
Military pilots and professional athletic coaches both stress body mechanics for a reason: the best way to avoid injuries is to make sure every move is intentional and controlled. The same thinking applies in the shop. A strong, balanced stance lets you adjust for the unexpected and gives you more confidence behind the saw.
Never Reach Over the Blade (No Matter How Tempting)
It’s easy to get comfortable and start thinking about efficiency instead of safety. But reaching over or across the blade for offcuts or to clear sawdust is risky business. Even after the blade has stopped, it’s best to make a habit of using a stick, dowel, or even just waiting until everything is safe. The risk is simply not worth a split-second shortcut.
I’ve trained myself to let offcuts drop where they may during a cut. Once the blade has stopped, I use a push stick, brush, or even a small block of scrap wood to pull pieces away from the spinning teeth. That way, my hands stay out of harm’s way, and I avoid developing careless habits.
Keep the Saw in Top Shape with Regular Maintenance
A well-tuned saw isn’t just about getting smoother, more accurate cuts; it’s also safer. I set aside time periodically to check for loose hardware, dull blades, or alignment issues. A dull blade makes the saw work way harder and can cause the wood to bind or burn. Tight hardware, lubrication, and occasional cleaning keep all the moving parts happy and less likely to surprise you while you’re working.
Checking the power cord and switch is part of my routine too. Frayed wires or sticky switches can lead to unpredictable starts or fail to turn off. A quick check on the belts and pulleys, if your saw is beltdriven, will help avoid sudden surprises and maintain steady power delivery.
Also, check the dust extraction collection regularly to make sure chips and sawdust aren’t clogging up. Good airflow keeps you breathing easy and helps prevent accidental fires in the shop due to accumulated dust around the saw motor.
Always Turn Off and Unplug the Saw for Adjustments and Blade Changes
It’s tempting to think the saw is safe when switched off, but I always unplug it before any adjustments or changing the blade. I’ve heard stories of people bumping the power switch while reaching for the blade, leading to some really scary moments. Unplugging removes the chance for mistakes, even if you knock the switch or someone else in the shop flips it by accident. This extra minute of effort is way less frustrating than a hand injury or worse.
Smart Habits and Common Situations to Watch Out For
- Distraction: Multitasking or chatting while using the saw can break your rhythm and focus. I make it a rule to pause if I feel my focus slipping, even if just for a few seconds.
- Fatigue: End-of-day or latenight cutting is when mistakes pile up. If you’re not feeling alert, it’s not worth pushing through. Give yourself a break.
- Unfamiliar Cuts: For specialty cuts or new techniques, I check the manual or watch a video. No shame in brushing up, because every saw handles differently.
- Rushed Setups: Skipping checks to save time can backfire quickly. Even if you’re feeling hurried, a quick once-over of the saw setup pays off every time.
Spend a few extra minutes making sure you’re not starting a cut under stress, hunger, or pressure. It nearly always leads to simple errors that could have been avoided with more patience. The best woodworkers I know all have stories about accidents narrowly avoided—or lessons learned because they were too eager to finish something late at night.
Personal Story of How Quickly Kickback Happens
We were having a Thursday night ladies woodworking night in my shop. There were half a dozen ladies working on their projects, while I helped them and watched over how they were doing.
One of the women was using the table saw making bevel cuts on the wood she was cutting for a jewelry box. I was by the workbench about 8 feet and to the left of the front of the saw. I was helping another of the ladies with something.
I had just turned around to see how it was going at the table saw. The push stick that was being used came flying back at me and hit me right in my right wrist. There was such force in the hit, my hand and wrist immediately swelled.
There is always a first aid kit in my shop, so I quickly took some Advil. The ladies quickly surrounded me and prayed for my hand and wrist. Almost immediately, the pain subsided. The swelling was gone by the end of the night.
The lady using the saw was visibly shaken as well, of course. I knew God was watching over our little group when I picked up the push shoe she was using. The saw marks were right across where her hands should have been holding the push shoe. You can see that in the picture below.
So, the lesson to take from this is that kickback happens VERY QUICKLY. You only come into the world with ten fingers. Be sure to work smart in woodworking to be sure you keep those ten fingers.
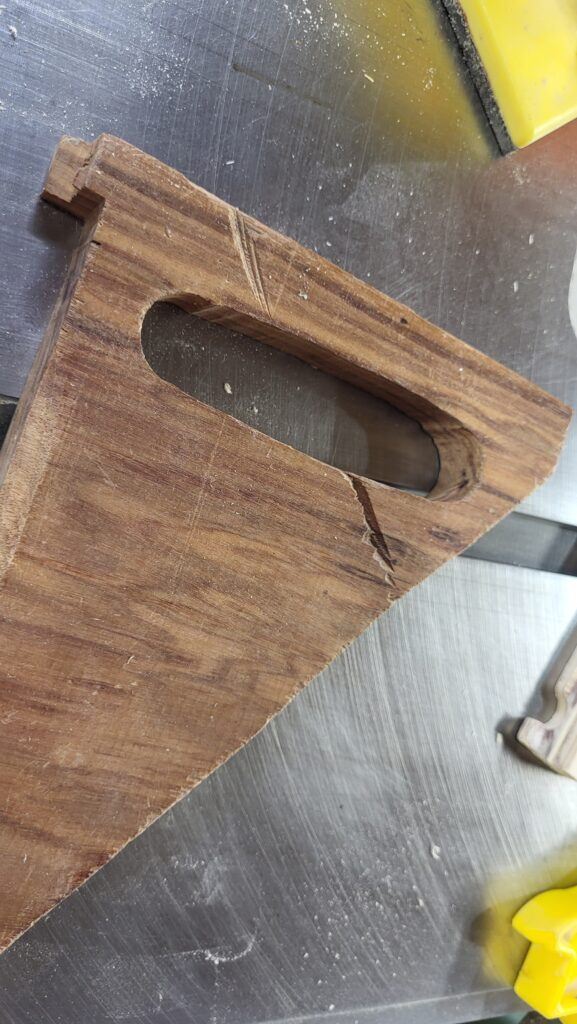
This is the push shoe the woman was using that night. The saw marks cut exactly where her hand would have been gripping the handle. It was only by God’s grace that no one was seriously hurt. The blade caught the shoe and launched it into my wrist.
Frequently Asked Table Saw Safety Questions
Q: Do I always need to use the blade guard?
A: Whenever possible, yes. Some cuts like dadoes or grooves might not allow it, but for everyday rips and crosscuts, it’s a solid safety net. Removing it should be the exception, not the rule—and when you do, use push blocks and featherboards for added safety.
Q: How do I tell if wood might kick back?
A: Boards with knots, twists, or warped areas are more likely to bind and kick back. If the wood fights you, stop and reassess. A riving knife or splitter can help prevent this kind of dangerous binding.
Q: What’s the best first safety upgrade if my saw is older?
A: Adding a riving knife—if your saw can accept one—is the best option. If not, install a splitter with anti-kickback pawls, and always use quality push sticks and featherboards.
Q: Should I wear gloves when using a table saw?
A: I recommend against it. Gloves can snag and pull your hand toward the blade. Bare hands with solid grip and proper push tools give you better feel and control.
Q: What should I do if the saw starts making strange noises?
A: Stop immediately and unplug it. Sounds like squeaking, grinding, or unexpected vibrations may mean loose parts, a damaged blade, or something caught in the housing. Never ignore unusual noises—they’re often early warning signs.
Q: Are aftermarket safety tools like featherboards worth it?
A: Absolutely. Magnetic featherboards, better push blocks, and safety switches all contribute to a safer, more controlled work environment. If they help you work more confidently, they’re worth it.
Q: Do I need hearing protection for quick cuts?
A: Yes. Even a short cut can expose you to damaging decibel levels. Earmuffs or earplugs protect your hearing over the long haul—don’t skip them just because you’re making “one quick cut.”
Q: Can I make my own push stick?
A: Definitely. Many of us cut them from scrap wood. Just be sure yours is long enough, comfortable to grip, and keeps your hands well away from the blade.
Key Takeaways for a Safer Shop
- Use the blade guard whenever possible — it’s your first line of defense.
- Always use a riving knife or splitter to prevent kickback.
- Keep your hands and fingers safe by using push sticks, push blocks, and featherboards.
- Stand just to the side of the blade — never directly behind the cut path.
- Double-check your setup before every cut — rushing leads to mistakes.
- Perform regular maintenance to keep your saw running safely and smoothly.
- Unplug the saw before any adjustments or blade changes — safety starts before the cut.
Wrap Up
Treating table saw safety as a routine part of every cut turns it into a habit, not a chore. Comfortable workflows start with a respect for the risks, the right gear, and the patience to do things right. Keeping the saw maintained, using push sticks, standing to the side, and double-checking setups all combine for a smoother, safer woodworking experience. It’s always easier to finish a project with all ten fingers intact!
Wrapping up: The ultimate goal is to enjoy your time in the shop and create beautiful work without incident. Start every session with intention, trust your safety habits, and don’t take shortcuts. When table saw safety is second nature, you’ll build your skills on a strong foundation and set yourself up for years of productive, injury-free woodworking. Stay sharp in every sense—your projects (and your hands) will thank you.
Additional Resources:
- OSHA Woodworking Safety Guidelines
Stay up-to-date on workplace safety standards for woodworking.
Visit OSHA’s Woodworking Safety Page - Fine Woodworking: Table Saw Safety Tips
Expert advice and techniques for using your table saw safely.
Read Fine Woodworking’s Safety Tips - SawStop Safety Technology
Learn about SawStop’s technology designed to prevent injuries by stopping the blade upon contact with skin.
Discover SawStop - YouTube: Table Saw Safety Demonstrations
Watch instructional videos on safe table saw practices and techniques.
Browse YouTube Safety Videos - “The Table Saw Book” by Kelly Mehler
A trusted resource for comprehensive table saw setup, maintenance, and safety practices.
Check Out The Table Saw Book on Amazon - Wood Magazine: Table Saw Safety Features
In-depth guide to table saw safety features and how to keep your shop safe.
Explore Wood Magazine’s Safety Articles
These are the same types of tools I use in The Master’s Workshop of Wisconsin and trust enough to recommend. They’ve kept *my* fingers safe—let’s keep yours that way. 😄
Recommended Table Saw Safety Gear
Over the years, I’ve used a lot of different safety tools and accessories in my shop. These are the ones I recommend. Many of which I personally use— and would hate to be without.
👣 Underfoot
• Tip: Anti-fatigue mat – Standing at the saw for long sessions? These help reduce back and joint strain. Also softens the blow if you drop a delicate piece.
• FEATOL Anti‑Fatigue Mat – A sturdy, ergonomic mat that supports your legs and back during long shop sessions. Available in multiple sizes and colors, with a high‑visibility yellow border for added safety.
🖐️ Hand Safety
• Taytools Safety Push Blocks (2‑pack) – Bright, grippy, and affordable—great for feeding stock safely during rip cuts or small part work.
• WoodRiver 11‑in‑1 Push Stick – Multi-tool style with angle guides and a ruler built right in.
• MICROJIG GRR‑RIPPER GR‑200 Advanced 3D Pushblock – I have two of these and wouldn’t want to be without them. They’re perfect for thin cuts, and I use them on the table saw, router table, and band saw.
• MICROJIG MJ SPLITTER SP‑0125 (1/8″ Full‑Kerf) – Helps prevent binding and kickback. Available in versions for other kerf widths too.
Kickback & Feed Control
• POWERTEC Featherboards – A budget-friendly classic that helps hold stock securely.
• MagSwitch Magnetic Featherboard Bundle – A high-quality magnetic featherboard with strong grip and easy adjustability. Ideal for smooth, safe cuts without needing a miter slot. One of the most versatile and reliable hold-downs.
• BOW FeatherDUO FP3 Stackable Featherboard – My new go-to. These flex forward and really hold strong backward—great grip and smooth feed.
• BOW FencePRO FP4 Featherboard (2‑pack) – These mount to your fence and add extra safety for vertical stability.
🔄 Blade Coverage & Dust Control
• SawStop Dust‑Collection Blade Guard (TSG‑DC) – Combines clear visibility, dust control, and anti-kickback features.
• PSI TSGUARD Table Saw Dust Collection Guard — Clear, shatter-resistant hood with 4″ dust port and swing-away arm — a solid, affordable alternative to premium overhead guards.
• Tip: Table saw cover – Great for protecting the saw when not in use or when doubling your saw top as a temporary work surface.
👀 Eye & Face Protection
• Jackson Safety MAXVIEW Premium Face Shield – I’ve used many types of eye protection, and this is by far the best. It fully covers my face and neck—chips don’t end up down my shirt. My other eye gear now just collects dust.
3M™ Over-The-Glasses Safety Eyewear – A perfect fit for those who wear prescription glasses. These clear, scratch-resistant lenses protect your eyes without sacrificing visibility or comfort.
👂 Hearing Protection
• 3M™ PELTOR™ Optime™ 105 Earmuffs – Over-the-head design with a 30 dB NRR for serious noise reduction and all-day comfort in the shop.
• DEWALT Bluetooth Earmuffs (DPG17) – Great for music or calls while working. Durable and OSHA-compliant.
• ISOtunes LINK Bluetooth Hearing Protection Headphones – Offers high-level hearing protection and ambient awareness.
• ISOtunes PRO 2.0 Bluetooth Earplug Headphones (NRR 27) – I love these. I listen to books or music in the shop while keeping my ears safe.
• Walker’s Safety Pro-Tek Ear Plug Band, 25Db Protection – Lightweight, comfy, and no batteries required.
• Walker’s Muff Protective Case – A small hard-shell case keeps your muffs or earbuds clean and protected when not in use.
😷 Respiratory Protection
• 3M™ Aura™ 9205+ N95 Mask (5‑pack) – Comfortable, low-profile design with great breathability and nose fit—individually wrapped and trusted for all-day dust protection.
• Z Mask M2 Mesh Dust Mask with Carbon Filters – I have the green one. The outer shell is washable and the carbon filters are replaceable. Works great—just don’t put it on upside down like I have (more than once!).
• BASE CAMP M Plus Reusable Dust Mask with Dual Valves – Adjustable, washable, and includes extra filters. I like the dual valves—they really help with fog control.
When you click and buy through our links, you’re not only upgrading your woodworking game but also supporting The Master’s Workshop of WI—at no extra cost to you. It’s a win-win: you get the best tools, and we keep bringing you top tips and content!
Mike’s Favorites
These are the tools I reach for on almost every project. The seven below are my quick-grab essentials—open the full list for everything I keep on the bench and in my apron.
Top 7 Essentials
- iGaging 6″ Fastener Cal Digital Caliper — Quick, precise checks.
- iGaging 7” and 12” Layout Square Set (also available at Taylor Toolworks) — Reliable layout reference.
- Starrett 6″ Double Square — Everyday layout accuracy.
- Woodcraft 16 ft Tape Measure (Fractional) — Compact; blade stays out on its own.
- Taytools Stainless Steel 6″ Machinist Ruler (4R) — My most-used small measuring tool.
- RZ Mask M2 9-Piece Woodworker’s Kit — Reusable protection against fine dust; far more comfortable than disposables (also available at Amazon).
- ISOtunes PRO 3.0 Bluetooth Hearing Protection — OSHA-certified hearing protection with streaming and calls.
➤ See my full list of Favorites
On the Bench Tools
- iGaging IMPERIAL Bench Squares – Stainless steel blades with wide anodized aluminum base.
- iGaging 7” and 12” Layout Square Set – Anodized aluminum (also available at Taylor Toolworks).
In My Apron Tools
- Katz-Moses 20 oz Waxed Canvas Tool Apron (The apron isn’t in my apron—LOL—but I’d be lost without it.)
- iGaging 6″ Fastener Cal Digital Caliper
- 6-Pack Mechanical Carpenter Pencils with Sharpener and Refills
- Pentel GraphGear 1000 Mechanical Pencil
- Calculated Industries 4019 Material Estimator Calculator
- Woodcraft 16 ft Tape Measure (Fractional) or FastCap Old Standby 16 ft (also at Taylor Toolworks). I prefer the Woodcraft because it’s smaller and the blade stays out on its own. The FastCap works too, but you have to lock and release the blade each time.
- Starrett 6″ Double Square – Hardened graduated blade.
- Starrett 4″ Double Square – Satin chrome finish, hardened blade.
- iGaging 4″ & 6″ Double Square Set (also at Taylor Toolworks). I was gifted my Starrett squares and treasure them, but this iGaging set is a well-made, affordable alternative I’d recommend if you’re buying your own.
- Lufkin Red End Extension Folding Rule (5/8″ × 6 ft) or Crescent Lufkin Wood Rule (6′ Brass Extension). I keep a folding rule for places a tape can’t manage—checking inside a box for square, or when I need a longer, rigid measure. Get one with a brass extension so you can capture full measurements when another arm won’t swing into place.
- Taytools Stainless Steel 6″ Machinist Ruler (4R) Even with other measuring tools, this little rule probably gets used the most.
- EverBrite 9-LED Flashlight, 6-Pack (Assorted Colors)
- Mikov Thin Blade Dual Bevel Marking Knife (0.060″, Rosewood Handle)
- Narex Thin Blade Dual Bevel Striking Marking Knife (also at Amazon). Yes, I carry two knives: this one’s longer for reach where the Mikov can’t go.
Shop Safety Essentials
- RZ Mask M2 9-Piece Woodworker’s Kit — Breathable, reusable, and essential for sanding/cutting (also available at Amazon).
- ISOtunes PRO 3.0 Bluetooth Hearing Protection — OSHA-certified hearing protection with streaming and calls.
Some links above are affiliate links. Thanks for supporting The Master’s Workshop of WI!
This list is updated as I refine my shop setup and favorite tools.
Hi Mike Grawvunder
The personal story about the Thursday night woodworking group is incredibly powerful and really drives home just how fast kickback can happen even when using a push stick. The fact that the saw marks lined up exactly where hands would have been is a chilling reminder of why safety gear and proper technique aren’t optional. It’s inspiring to see such an emphasis on community and faith in that moment too. How can we better train new woodworkers to recognize the warning signs of potential kickback? Would mandatory dry-run practices for beginners help reduce risk in shared shop environments?
The blend of real-world experience with practical safety steps throughout this article makes it feel like you’re getting advice from a seasoned mentor, not just a manual. Truly a must-read for anyone serious about woodworking safely.
Thank you so much, Ravin. I really appreciate your thoughtful comment — especially your question about dry-run practices. That’s a great idea, and one I’ll start incorporating more intentionally, especially when I’m mentoring new woodworkers. Taking a moment to walk through the process before touching the switch can prevent a lot of heartache.
I’m grateful the story spoke to you. That night could have ended very differently, but by God’s grace, it became a teaching moment instead. We pray before every session in the shop — and that night, those prayers meant a lot. Safety’s not just about gear and technique… it’s also about watching out for each other.
Thanks again for reading and for encouraging others to take shop safety seriously.
— Mike G
Hey a great post you have created here
Safety is really important especially with equipment like this. There are many places which still don’t implement safety precautions or rules properly which causes accidents at work places, that could have been avoided.
Posts like these should be shared, it contains essential information which managers too can learn from.
Thanks again and have a great day!
Hi Sariya — thank you so much for your thoughtful comment and encouragement!
You’re absolutely right—too many accidents happen simply because basic safety precautions are overlooked or taken for granted. I wrote this post with both beginners and seasoned woodworkers in mind, because it only takes one moment of distraction for something to go wrong.
I really appreciate you taking the time to read and comment—thanks again, and I hope you have a safe and productive day too!
– Mike G
The Master’s Workshop of WI